January 2023 by Remco Bouckaert
There is a way to make BEAST run about 20% faster on M1 processors by using Docker. There are a few caveats though: it only works through the command line interface, so if you are more comfortable with the GUI version of BEAST this is not for you. Further, it is a bit of a hassle to move files between Docker and OS X, and you need log and tree files for post processing on OS X with GUIs like Tracer and DensiTree.
An alternative is to use a Linux virtual machine through UTM on OS X, which is equally faster, and comes with a GUI, but is a bit harder to set up and perhaps for a later post.
Why is Docker faster?
The Docker image uses java for ARM processors, while the OS X version uses the x86-64 version, which is translated by Rosetta 2 to ARM instructions. There are implementations of Java for ARM on OS X, but they perform worse than the x86-64 version for BEAST at the moment. For example, with the Bellsoft full JRE for aarch64 calculation times are about 33% larger when not using BEAGLE for the testHKY1044.xml benchmark file (see more on benchmarking at the end of this post). It is not clear to me why the ARM versions are slower, but do not hesitate to let me know if you have any ideas, in particular what can be done to improve its performance.
Installing Docker
Follow instructions from the Docker documentation site to install Docker. Be sure to install the version of Mac with Apple silicon.
TL;DR
Run once with Dockerfile from section below
docker build --platform linux/arm64/v8 -t beast2 - < Dockerfile
Copy beast.xml to docker:
docker cp beast.xml `docker ps -alq`:/root/beast.xml
Running BEAST:
docker run --platform linux/arm64/v8 --entrypoint /bin/bash -it -p 5900:5900 beast2
beast beast.xml
exit
Copy log files from docker:
docker cp `docker ps -alq`:/root/beast.log beast.log
docker cp `docker ps -alq`:/root/beast.trees beast.trees
Create Docker image
Store the following in a file called Dockerfile:
FROM openjdk:8

RUN apt-get update
# Install stuff required later
RUN apt-get install -y curl git

ARG DEBIAN_FRONTEND=noninteractive

ENV USER root

WORKDIR /root/


# Add BEAST 2
RUN curl -fsSLO https://github.com/CompEvol/beast2/releases/download/v2.7.3/BEAST.v2.7.3.Linux.aarch64.tgz \
	&& tar fxz BEAST.v2.7.3.Linux.aarch64.tgz

ENV PATH=/root/beast/bin:$PATH

# Install BEAGLE
RUN apt-get update && apt-get install -y cmake build-essential autoconf automake libtool pkg-config
RUN git clone --depth=1 https://github.com/beagle-dev/beagle-lib.git

RUN cd beagle-lib \
    && mkdir build \
    && cd build \
    && cmake -DBUILD_SSE=OFF -DBUILD=_CUDA=OFF .. \
    && make install \
    && ldconfig

ENV LD_LIBRARY_PATH=/usr/local/lib:$LD_LIBRARY_PATH

# Add BEAST 2 packages: change to your requirements:
RUN packagemanager -add ORC
RUN packagemanager -add BICEPS

ADD . ./

RUN echo "#!/bin/bash\n" \
        "export USER=root\n" > entrypoint.sh

RUN chmod a+x entrypoint.sh

ENTRYPOINT ["./entrypoint.sh"]

CMD ["beast2"]
If you want to install packages, after the line # Add BEAST 2 packages add RUN packagemanager -add XYZ for each package XYZ you need. (In principle, you can install packages later when starting the container, but their installation will be lost every time you restart the container.)
Then, create the Docker image as follows in a terminal:
docker build --platform linux/arm64/v8 -t beast2 - < Dockerfile
It sets up Linux, BEAST 2 (and required packages), development tools for compiling and installing BEAGLE, so it may take a while for this process to finish. This process needs to be done only once: you can run many BEAST analyses without having to build the image again.
Then, in a terminal, run
docker run --platform linux/arm64/v8 --entrypoint /bin/bash -it -p 5900:5900 beast2
to start using the container. Use exit or [Control]-D to exit the container.
Copying XML files to docker
The general format for copying to and from a Docker container is
docker cp /path/to/source/file [container ID]:/path/to/target/file
docker cp [container ID]:/path/to/source/file /path/to/target/file
respectively. To copy XML files produced by BEAUti to the docker image from a terminal, first find the ID of the docker image
docker ps
which outputs something like
CONTAINER ID   IMAGE     COMMAND       CREATED       STATUS       PORTS                    NAMES
62b9c5f3cb8b   beast2    "/bin/bash"   2 hours ago   Up 2 hours   0.0.0.0:5900->5900/tcp   eloquent_merkle
Here 62b9c5f3cb8b is the ID you are interested in. Then, to copy a file, use
docker cp beast.xml 62b9c5f3cb8b:/root/beast.xml
A short-cut, if beast2 was the last image created is to use docker ps -alq to get the ID, like so:
docker cp beast.xml `docker ps -alq`:/root/beast.xml
Running BEAST in docker
In a terminal, run
docker run --platform linux/arm64/v8 --entrypoint /bin/bash -it -p 5900:5900 beast2
Assuming beast.xml contains the XML you want and is copied to /root/beast.xml, run
beast beast.xml
If you forgot to specify the root directory when copying, files will end up in the / directory, so you can run beast /beast.xml instead.
Copying log and tree files from docker
Assuming we use the same container above, and beast.log and beast.trees have been produced by beast.xml in the /root directory, uset the following to copy them:
docker cp 62b9c5f3cb8b:/root/beast.log beast.log
docker cp 62b9c5f3cb8b:/root/beast.trees beast.trees
or
docker cp `docker ps -alq`:/root/beast.log beast.log
docker cp `docker ps -alq`:/root/beast.trees beast.trees
if you want it from the latest container.
Benchmarking
Here are the run times in seconds of the 12 benchmark XML files from here. Both OS X and Docker use BEAGLE. These are single runs, but there does not tend to be a lot of variation in run times (unlike ESS per unit of time), and given the run time improvements on Docker are fairly consistent, it does not seem to be necessary to run multiple times.
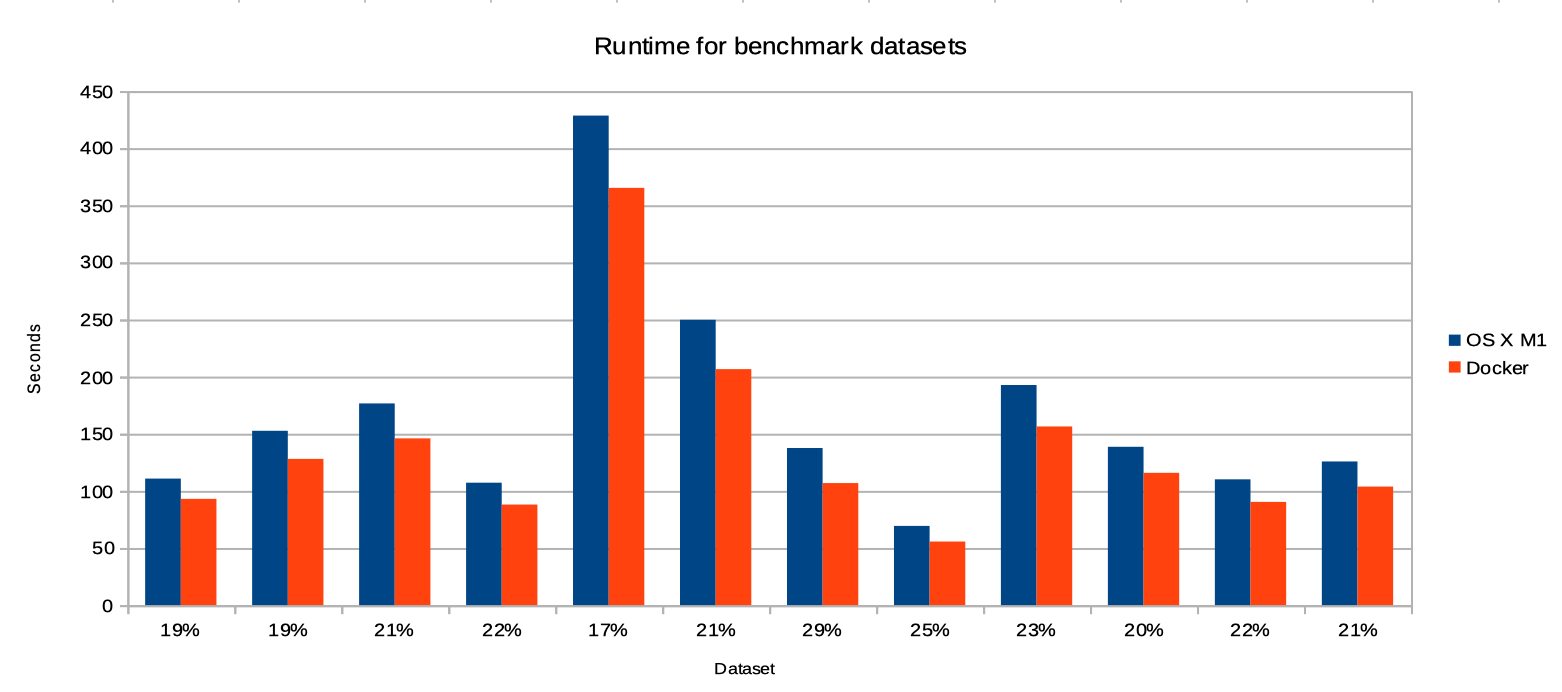
Each bar represents a dataset (in alphabetical order, so the first is for testHKY1044.xml and the last for testHKY767.xml) and lower bars are better. Below the bars is the improvement in run time (=100*(OS X runtime/Docker runtime)-1). On average, run time improvement is just over 20%, which means you can run 6 analyses on Docker in the same time as only 5 on OS X.
Changing JRE
If you want to run BEAST with ARM based java, first move the current jre directory:
cd /Applications/BEAST\ 2.7.3/
mv jre jre.zulu
Then, download an ARM based JRE for OS X, but make sure that
- javafx is included. For example, when using the Bellsoft JRE select the “full” version, and
- use at least version 17. Lower versions won’t work.
Finally, unzip the file with the JRE, and move its content to the directory /Applications/BEAST\ 2.7.3/jre. When doing ls /Applications/BEAST\ 2.7.3/ you should see something like this:
DISCLAIMER	Welcome.html	conf		lib		release
OPENJFX_LICENSE	bin		legal		readme.txt
That is, you should see a bin directory containing java executable.
Update 1/9/2025: the ARM versions of current versions of the JDK (e.g. Java 21) appear to have caught up, and are now equally fast as running in Docker. Therefore, it may be worth the effort of replacing the JRE that comes with the BEAST install with one that is more modern and get an instant 20% or so boost in performance. Since BEAST2 aims for Java 17, there is potential for some features to not work, but checking the list of changes I could not find anything detrimental, and a quick BEAST run gave exact the same results under Java 17 as Java 21, so I think things are OK.